Introduction
Traditional signature-based intrusion detection systems (IDS) have always known exactly what they were looking for: a specific byte sequence, a known exploit pattern, or a malicious hash. But the modern threat landscape demands more. Attackers now use polymorphic code, legitimate tools repurposed for attacks, and low-and-slow techniques that evade fixed signatures. The answer lies in shifting from the question 'Does this match a known pattern?' to 'Does this actually make sense in context?' This guide takes you through the practical steps to build a context-aware detection system using SnortML and autonomous agentic AI. By the end, you'll have an evolving architecture that not only detects anomalies but reasons about them in real time.
What You Need
- A running Snort installation (version 3.0 or later recommended for built-in ML support)
- Basic Python development environment (Python 3.8+) with libraries: TensorFlow or PyTorch, scikit-learn, and pandas
- Access to labeled network traffic datasets (e.g., CICIDS2017, NSL-KDD, or your own captured traffic)
- An agent orchestration framework (e.g., LangChain, AutoGPT, or a custom environment using Python asyncio)
- Logging and visualization tools (ELK stack, Grafana, or similar)
- A test environment (isolated network segment or virtual lab) to avoid production disruptions
- Basic familiarity with machine learning workflow (training, validation, and deployment)
Step-by-Step Guide
Step 1: Understand the Shift – From Pattern Matching to Contextual Reasoning
Before touching any configuration, internalize the paradigm change. In a signature-based system, every packet is compared against a static rule set. In a context-aware system, each event is evaluated against a model of “normal” behavior and further analyzed by agents that ask: Is this action consistent with the user’s baseline? Does the timing suggest lateral movement? Could a legitimate tool be used maliciously? This conceptual foundation is critical for every subsequent decision. Study MITRE ATT&CK tactics for real-world attack chains and map them to your environment’s typical data flows. Document your network’s normal communication patterns (ports, protocols, volume) so you can later train your ML model to recognize deviations.
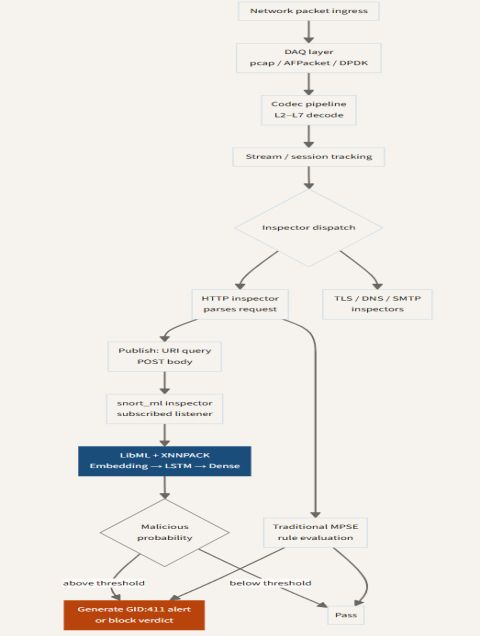
Step 2: Install and Configure SnortML
SnortML is an extension to Snort that integrates machine learning pipelines directly into the packet inspection flow. Start by compiling Snort with the --enable-ml flag. Then install the snortml Python package from the official repository. Configure snort.lua to load the ML module and specify the path to your pre‑trained model (you’ll train one in Step 3). Create a baseline policy: while SnortML can replace some rules, keep your existing signature sets for known threats – the ML layer works best as a complement. Test the integration by replaying a small pcap with both normal and malicious traffic. Verify that SnortML logs events with a confidence score (0–100) rather than a simple match/no‑match. This score will be the gate for agents in Step 4.
Step 3: Train a Context‑Aware Anomaly Detection Model
Your ML model must learn what “normal” looks like. Use the datasets you collected – or a public one like CICIDS2017 – and engineer features that capture context: inter‑arrival times, packet sizes, protocol flags, flow durations, and destination port entropy (as a proxy for randomness). Train a classifier such as an Isolation Forest or a Variational Autoencoder (VAE) that outputs a reconstruction error. When a new flow’s error exceeds a threshold, it’s flagged as anomalous. Key nuance: don't train only on known attacks. Include perfectly normal traffic with slight variations (e.g., legitimate updates). Evaluate the model’s false‑positive rate on your own network logs. Export the trained model to TensorFlow SavedModel or ONNX format and place it in the location specified in Step 2.
Step 4: Build Your Agentic AI Layer
Now the system becomes truly “thinking.” An agentic AI is an autonomous agent that receives SnortML alerts and performs a small decision cycle: Observe → Reason → Act. Use a framework like LangChain to create a custom agent. Define its tools: (a) a threat intelligence lookup (e.g., VirusTotal API), (b) a network flow history query, (c) a command to isolate a host via firewall rules, and (d) a feedback channel to re‑train the ML model. When an alert arrives with a high confidence score, the agent queries the context: Has this source IP ever appeared? Is the destination port unusual for this time of day? Does the payload resemble a known C2 beacon? The agent then decides: log for review, automatically block, or escalate to a human. Important: Keep the agent’s actions reversible and time‑limited (e.g., block for 30 minutes) to minimize damage from false positives.
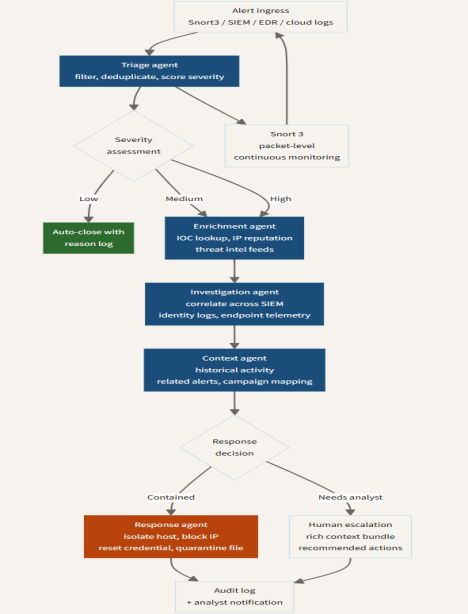
Step 5: Create a Feedback Loop – Continuous Learning
A static ML model decays as the network evolves. Implement a feedback loop where confirmed detections (from your agent or a human analyst) are sent back to the training pipeline. Use a database to store alerts tagged with ground truth (benign vs. malicious). Periodically retrain the model every 7–30 days depending on traffic volume. Embed a simple reinforcement signal: if the agent blocked a host that a later investigation found benign, decrement its confidence; if it caught a real attack, increment it. This closes the loop, making your system adaptive without manual tuning.
Step 6: Test, Tune, and Deploy Incrementally
Run the full system in your test environment for at least two weeks. Monitor the agent’s actions and the ML model’s accuracy. Use a confusion matrix to track false positives and false negatives. Adjust the anomaly threshold (Step 3) and agent decision rules (Step 4). Deploy to production in “monitor‑only” mode first: the agent logs what it would do, but doesn’t block. After one week, switch to automatic blocking for alerts with confidence >95%. Gradually lower the threshold as you gain trust. Document every configuration change and keep a rollback plan.
Tips for Success
- Start small: Don’t deploy agentic AI on your entire network at once. Pick a single segment (e.g., DMZ) to prove the concept.
- Embrace false positives as data: Every false alarm is an opportunity to refine your model. Label them diligently.
- Simplify the agent’s world: Give it access to only the information it needs – too many tools lead to reasoning paralysis.
- Log everything: Keep a trace of every alert and every agent decision. This becomes invaluable for post‑incident review and model improvements.
- Remember the baseline: Your context model is only as good as your definition of “normal.” Re‑baseline quarterly and after any major network change.
- Human oversight remains essential: The agent is an assistant, not a replacement. Always have a way for an analyst to override automated actions.
By following these steps, you transition from a brittle signature‑based IDS to a dynamic, intelligent detective that doesn’t just match patterns—it understands the story behind the traffic.